创建一个新的linux服务器安装步骤

从17年开始三年了,购买使用了不下十台vps,每次购买新的vps之后都需要对他进行初始化设置,很是繁琐,所以最近在写一个一键脚本,这样可以一键安装并设置所有需要的软件,方便了许多。目前脚本还没有完成,所以我先把初始化的这些步骤全部记录下来,既是方便自己,也可以为大家提供一份参考。

前期重要软件更新与安装

1
2
yum install nano git
yum update

ssh设置

第一种方式:使用密码登录,只修改端口

首先打开sshd_config

1
nano /etc/ssh/sshd_config

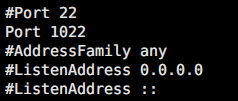
首先将Port 22取消注释,然后添加一行 Port 1022。保存退出

再将sshd服务重启。

1
systemctl restart sshd

这时候使用ssh连接工具连接你设置的端口(我的是1022),如果成功连接,则可以重复上述步骤将Port 22一行注释掉,这样22端口就不会暴露出来,部分保证安全。如果不能连接,可以去服务器提供商控制面板找找有没有端口开放设置。

第二种方式:使用秘钥登录,无需修改端口(更推荐)

  1. 修改文件:nano /root/.ssh/authorized_keys 并填入公钥。

  2. 修改以下字段:

1
2
3
PubkeyAuthentication yes

PasswordAuthentication no
  1. 重启sshd服务

安全设置

创建一个目录名叫AutoTasks,新建一个脚本,名称为auto_block_failed_ip.sh

脚本内添加如下内容:

1
2
3
4
5
6
7
8
9
10
11
12
13
#! /bin/bash
cat /var/log/secure|awk '/Failed/{print $(NF-3)}'|sort|uniq -c|awk '{print $2"="$1;}' > /usr/local/bin/black.list
for i in `cat /usr/local/bin/black.list`
do
IP=`echo $i |awk -F= '{print $1}'`
NUM=`echo $i|awk -F= '{print $2}'`
if [ ${#NUM} -gt 1 ]; then
grep $IP /etc/hosts.deny > /dev/null
if [ $? -gt 0 ];then
echo "sshd:$IP:deny" >> /etc/hosts.deny
fi
fi
done

保存退出

1
chmod +x auto_block_failed_ip.sh

将脚本添加可执行权限。

1
2
3
4
5
crontab -e
# 然后添加如下一行
0 * * * * /bin/sh /root/AutoTasks/auto_block_failed_ip.sh
# 注意将地址改为你设置的地址
# 作用是每天0点执行一次 封禁多次尝试登录失败的ip

安装caddy前的准备

创建一个新目录:

1
2
3
4
5
6
mkdir /var/www
cd /var/www
git clone https://github.com/librespeed/speedtest
cd speedtest
mv example-singleServer-pretty.html index.html
rm -rf example-*

如果想要真正的测速服务器,请参考我的这篇文章

安装caddy

请查看官方脚本进行设置。如下只是本文写成时官方的操作指南。

1
2
3
yum install yum-plugin-copr
yum copr enable @caddy/caddy
yum install caddy

创建一个Caddyfile

1
2
3
4
5
6
7
nano /etc/caddy/Caddyfile
# 粘贴如下内容
:80 {
root * /var/www/speedtest
file_server
reverse_proxy /mineray localhost:8888
}

启动caddy

1
2
3
4
systemctl enable caddy
systemctl start caddy
# 可以使用如下命令查看是否启动成功
systemctl status caddy

安装acme.sh

注意:在这一步之前,需要在你的dns服务商那里注册你的新域名,否则acme处理会失败!

1
2
3
curl  https://get.acme.sh | sh
# 使acme.sh命令生效
source ~/.bashrc

执行下面的命令:

1
2
3
4
5
6
7
8
9
10
11
12
13
14
15
# 注意将下方的your.site.name改为你的域名地址。

mkdir -p /root/cert/sites/your.site.name

#首先在acme注册,使用自己的邮箱。
acme.sh --register-account -m [email protected]
# 切换默认CA
acme.sh --set-default-ca --server letsencrypt

acme.sh --issue -d your.site.name --webroot /var/www/speedtest

acme.sh --install-cert -d your.site.name \
--fullchain-file /root/cert/sites/your.site.name/your.site.name.crt \
--key-file /root/cert/sites/your.site.name/your.site.name.key \
--reloadcmd "systemctl restart caddy"

安装V2RAY

1
2
3
bash <(curl -L https://raw.githubusercontent.com/v2fly/fhs-install-v2ray/master/install-release.sh)
# 安装最新发行的 geoip.dat 和 geosite.dat
bash <(curl -L https://raw.githubusercontent.com/v2fly/fhs-install-v2ray/master/install-dat-release.sh)

脚本设置:

1
nano /usr/local/etc/v2ray/config.json
1
2
3
4
5
6
7
8
9
10
11
12
13
14
15
16
17
18
19
20
21
22
23
24
25
26
27
28
29
30
31
32
33
34
35
36
37
38
39
40
41
42
43
44
45
46
47
48
49
50
51
52
53
54
55
56
57
58
59
60
61
62
63
64
65
66
# 粘贴如下内容, 将clients里面的id改成自己的,可以在这里生成:
# https://www.uuidgenerator.net/
{
"log": {
"access": "/var/log/v2ray/access.log",
"error": "/var/log/v2ray/error.log",
"loglevel": "warning"
},
"inbounds": [
{
"port": 8888,
"listen": "127.0.0.1",
"protocol": "vmess",
"settings": {
"clients": [
{
"id": "fa3caf94-7fd1-4cae-bf99-7c3f64dfe5bf",
"level": 1,
"alterId": 64
}
]
},
"streamSettings": {
"network": "ws",
"wsSettings": {
"path": "/mineray"
}
}
}
],
"outbounds": [
{
"protocol": "freedom",
"settings": {}
}
],
"routing": {
"strategy": "rules",
"settings": {
"rules": [
{
"type": "field",
"ip": [
"0.0.0.0/8",
"10.0.0.0/8",
"10.0.0.0/8",
"100.64.0.0/10",
"127.0.0.0/8",
"169.254.0.0/16",
"172.16.0.0/12",
"192.0.0.0/24",
"192.0.2.0/24",
"192.168.0.0/16",
"198.18.0.0/15",
"198.51.100.0/24",
"203.0.113.0/24",
"::1/128",
"fc00::/7",
"fe80::/10"
],
"outboundTag": "blocked"
}
]
}
}
}
1
2
3
4
systemctl enable v2ray
systemctl start v2ray
# 可以使用如下命令查看是否启动成功
systemctl status v2ray

安装 Trojan

请查阅官方教程进行安装,如下只是本文写成时官方的安装指南

1
sudo bash -c "$(curl -fsSL https://raw.githubusercontent.com/trojan-gfw/trojan-quickstart/master/trojan-quickstart.sh)"

脚本设置:

1
nano /usr/local/etc/trojan/config.json
1
2
3
4
5
6
7
8
9
10
11
12
13
14
15
16
17
18
19
20
21
22
23
24
25
26
27
28
29
30
31
32
33
34
35
36
37
38
39
40
41
# 粘贴如下内容,将密码改成自己的。证书路径改成自己的。
{
"run_type": "server",
"local_addr": "0.0.0.0",
"local_port": 443,
"remote_addr": "127.0.0.1",
"remote_port": 80,
"password": [
"password1",
"password2"
],
"log_level": 1,
"ssl": {
"cert": "/path/to/certificate.crt",
"key": "/path/to/private.key",
"key_password": "",
"cipher": "ECDHE-ECDSA-AES128-GCM-SHA256:ECDHE-RSA-AES128-GCM-SHA256:ECDHE-ECDSA-AES256-GCM-SHA384:ECDHE-RSA-AES256-GCM-SHA384:ECDHE-ECDSA-CHACHA20-POLY1305:ECDHE-RSA-CHACHA20-POLY1305:DHE-RSA-AES128-GCM-SHA256:DHE-RSA-AES256-GCM-SHA384",
"cipher_tls13": "TLS_AES_128_GCM_SHA256:TLS_CHACHA20_POLY1305_SHA256:TLS_AES_256_GCM_SHA384",
"prefer_server_cipher": true,
"alpn": [
"http/1.1"
],
"alpn_port_override": {
"h2": 81
},
"reuse_session": true,
"session_ticket": false,
"session_timeout": 600,
"plain_http_response": "",
"curves": "",
"dhparam": ""
},
"tcp": {
"prefer_ipv4": false,
"no_delay": true,
"keep_alive": true,
"reuse_port": false,
"fast_open": false,
"fast_open_qlen": 20
}
}
1
2
3
4
systemctl enable trojan
systemctl start trojan
# 可以使用如下命令查看是否启动成功
systemctl status trojan

安装Xray

注意,Xray和上面的v2ray、trojan是互斥的,装了上面的,就不要装Xray了。

参考这篇文章

1
bash -c "$(curl -L https://github.com/XTLS/Xray-install/raw/main/install-release.sh)" @ install -u root
1
nano /usr/local/etc/xray/config.json
1
2
3
4
5
6
7
8
9
10
11
12
13
14
15
16
17
18
19
20
21
22
23
24
25
26
27
28
29
30
31
32
33
34
35
36
37
38
39
40
41
42
43
44
45
46
47
48
49
50
51
52
53
54
55
56
57
58
59
60
61
62
63
64
65
66
67
68
69
70
71
72
73
{
"log": {
"loglevel": "warning"
},
"inbounds": [
{
"port": 443,
"protocol": "vless",
"settings": {
"clients": [
{
"id": "your uuid", //使用自己的uuid
"flow": "xtls-rprx-direct",
"level": 0
}
],
"decryption": "none",
"fallbacks": [
{
"dest": 80
},
{
"path": "/xray",
"dest": 8899,
"xver": 1
}
]
},
"streamSettings": {
"network": "tcp",
"security": "xtls",
"xtlsSettings": {
"alpn": [
"http/1.1"
],
"certificates": [
{
"certificateFile": "/root/cert/sites/your.site.name/your.site.name.crt",
"keyFile": "/root/cert/sites/your.site.name/your.site.name.key"
}
]
}
}
},
{
"port": 8899,
"listen": "127.0.0.1",
"protocol": "vless",
"settings": {
"clients": [
{
"id": "your uuid", //使用上面自己的uuid
"level": 0
}
],
"decryption": "none"
},
"streamSettings": {
"network": "ws",
"security": "none",
"wsSettings": {
"acceptProxyProtocol": true,
"path": "/xray"
}
}
}
],
"outbounds": [
{
"protocol": "freedom"
}
]
}

启用bbr

参考这篇文章

1
2
3
4
5
6
7
8
9
10
11
12
13
14
15
16
17
18
19
20
21
22
23
24
25
26
27
28
rpm --import https://www.elrepo.org/RPM-GPG-KEY-elrepo.org
rpm -Uvh http://www.elrepo.org/elrepo-release-7.0-3.el7.elrepo.noarch.rpm
yum --enablerepo=elrepo-kernel install kernel-ml -y
rpm -qa | grep kernel
# 下面这句执行后选中需要的内核,从0开始排序
egrep ^menuentry /etc/grub2.cfg | cut -f 2 -d \'
grub2-set-default 0

# 这里reboot

sudo modprobe tcp_bbr
echo "tcp_bbr" | sudo tee --append /etc/modules-load.d/modules.conf
echo "net.core.default_qdisc=fq" | sudo tee --append /etc/sysctl.conf
echo "net.ipv4.tcp_congestion_control=bbr" | sudo tee --append /etc/sysctl.conf
sudo sysctl -p

# 下面三个是检查有没有成功开启bbr
sysctl net.ipv4.tcp_available_congestion_control
sysctl net.ipv4.tcp_congestion_control
lsmod | grep bbr


wget -q https://www.ubuntulinux.jp/ubuntu-ja-archive-keyring.gpg -O- | sudo apt - key add -
wget -q https://www.ubuntulinux.jp/ubuntu-jp-ppa-keyring.gpg -O- | sudo apt - key add -
sudo wget https://www.ubuntulinux.jp/sources.list.d/utopic.list -O /etc/ apt /sources.list.d/ ubuntu -ja.list
sudo apt -get update
sudo apt -get upgrade

最后重启即可。